SharePoint Designer 2013 has some new features that allow you to call a web service from a workflow. I recently used this new feature to create a self-service site creation workflow for a Project Management Office (PMO).
The Process
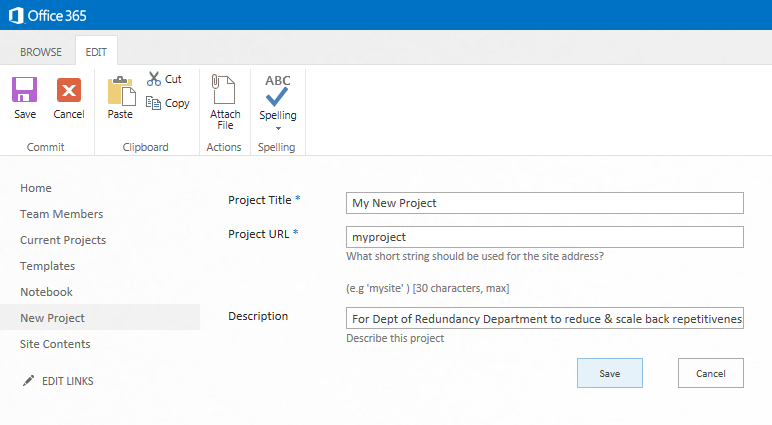
First I created a top-level PMO site which displays a dashboard with a CQWP to roll up of each project’s status. This level also contains a list titled “New Project.” Adding an item to New Project triggers the Create New Project Site workflow.
The workflow goes like this…
Narrative
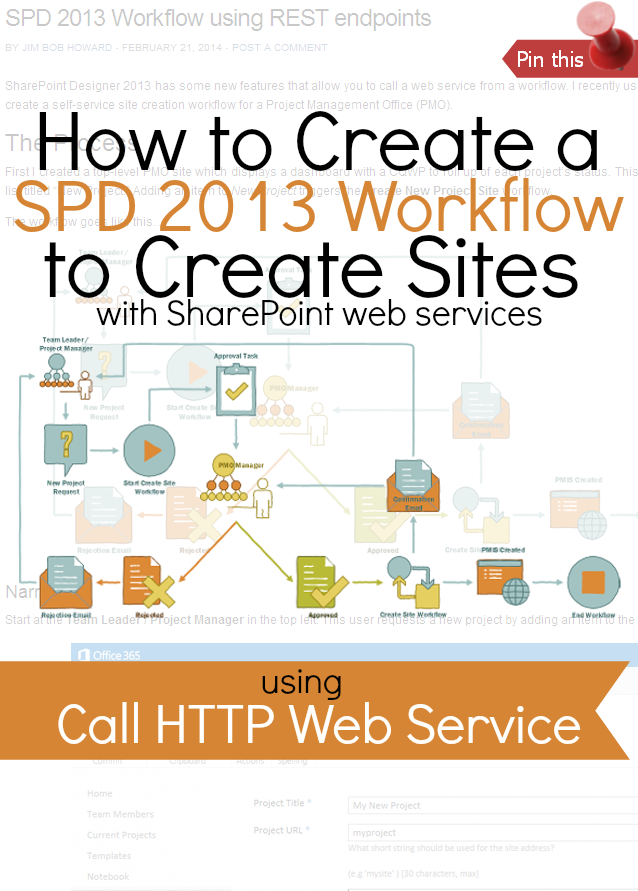
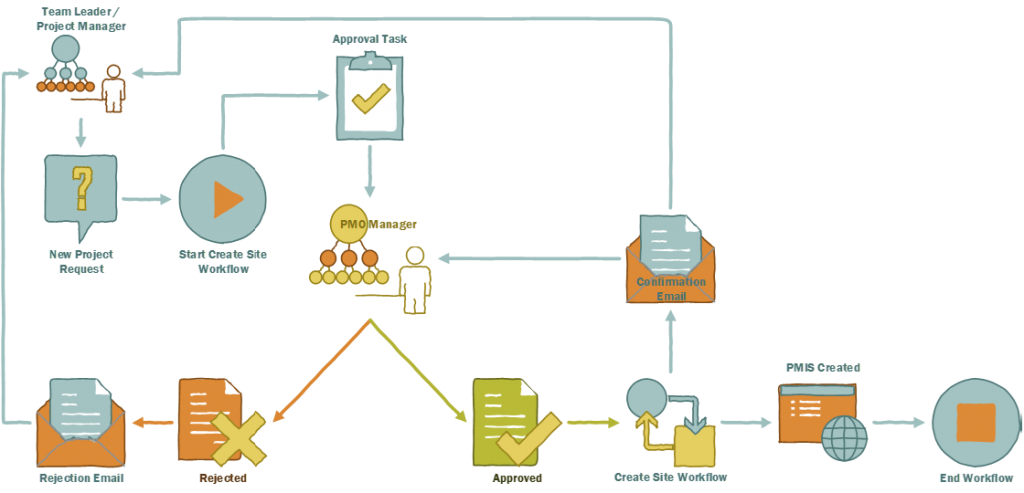
Start at the Team Leader / Project Manager in the top left. This user requests a new project by adding an item to the New Project list.
The New Project list has three columns:
- Project Title (required) – The full descriptive name of the project; this is also how the project will show up on the Project Status roll-up on the PMO site
- Project URL (required) – This will be appended to the PMO site as a subsite directory. (e.g. the example will create: [pmo-demo-site]/myproject)
- Description (optional) – Used for the site description
Our workflow will use these three columns to create the site.
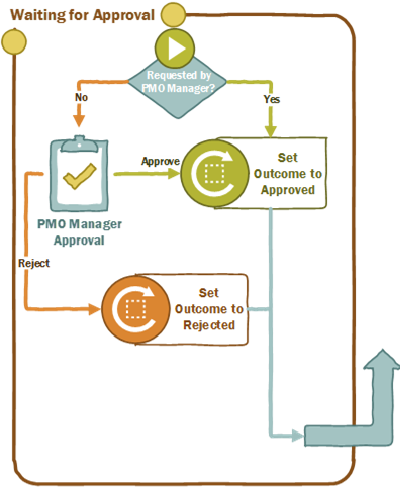
When the workflow starts, it checks to see if the request is from the PMO Manager. If so, it’s automatically approved; otherwise, the PMO Manager is sent an approval request to have the site created.
If approved, the site is created and the URL is emailed to the creator and the PMO manager.
If rejected, the site is not created and a rejection notice is emailed to the creator.
Once approved, if any error occurs during the creation process, the creator and the PMO manager both are sent an email with information about the error.
The SPD Workflow
Of course, the SPD workflow picks up after the New Project item is created, so we can show a streamlined view of it this way:
Narrative
SPD 2013 allows for the creation of stages, of which we have three:
- Waiting for Approval – This is the stage that determines if approval is needed and secures it, if so.
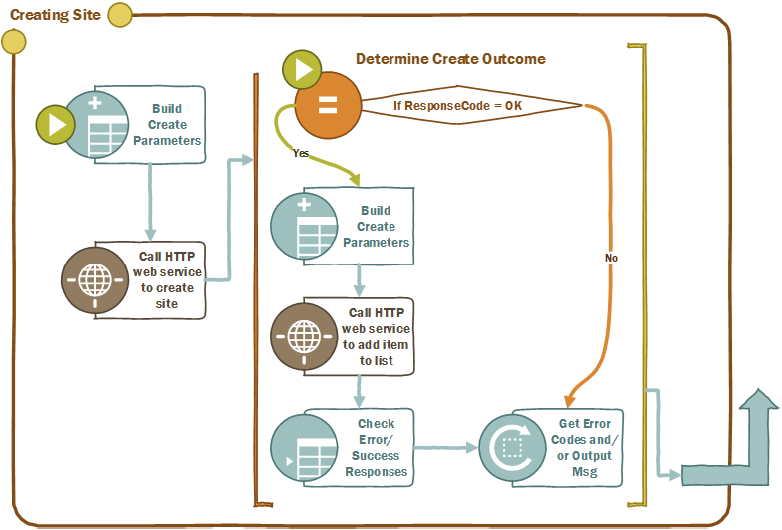
- Creating Site – This is the money of this post and we’ll cover it in more detail below.
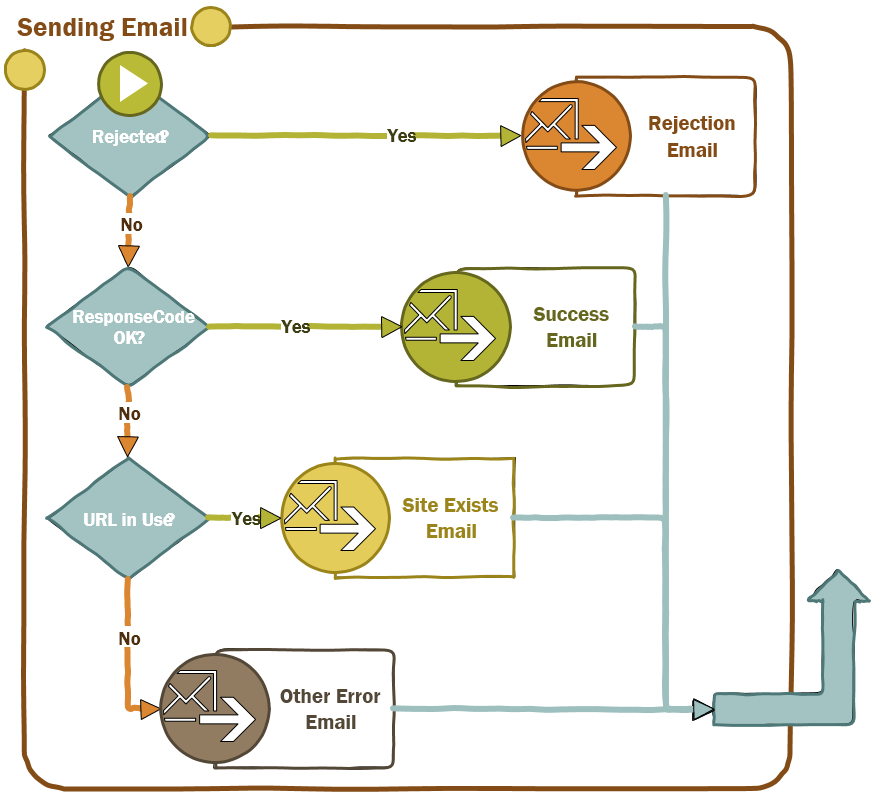
- Sending Email – This stage runs regardless of approval, rejection, confirmation, or error.
(Note: The stages are named with -ing verb phrases, because the stage name is used to update the workflow status.)
The two “easy” stages are the first and last, so let’s get those out of the way before we dive into the meat of creating the site.
Easy Stages
As stated above, this stage does one thing: determine if the request is approved or not.
This stage is pretty straightforward, too. It sends an email based on previous steps:
- Rejected – Send “rejection” email
- Approved & Successful – Send “success” email
- Approved & URL in use – Send “site exists” email
- Approved & some other error – Send “other error” email
Creating Site
Now comes the money of this post: Creating a site by calling a web service in an SPD 2013 workflow <– Tweet this
The first thing we have to do is build our create parameters for calling the HTTP web service to create the site.
To do this, SPD 2013 has a new data structure called Dictionary. A Dictionary is a composite data structure that can be made up of multiple data structures, including other dictionaries. The concept is very closely related to a data object in a development language, and is used in the same way.
(See this tutorial for How To: Complete basic operations using SharePoint 2013 REST endpoints by Kirk Evans)
To know how to build your dictionary, you need to know what the web service needs to run. We’re going to be calling the webinfos/add web service, which allows us to create a site via REST. Kirk’s post reference above includes this nugget for calling this service from JavaScript:
Creating a site with REST
The following example shows how to create a site.
JavaScript
 url: http://site url/_api/web/webinfos/add
 method: POST
 Headers:
     Authorization: "Bearer " + accessToken,
     X-RequestDigest: form digest value,
     content-type: "application/json;odata=verbose",
     content-length: length of post body
 body: { 'd' :{
     'parameters': {
         '__metadata':  {'type': 'SP.WebInfoCreationInformation' },
         'Url': 'RestSubWeb',
         'Title': 'RestSubWeb',
         'Description': 'rest-created web',
         'Language':1033,
         'WebTemplate':'sts',
         'UseUniquePermissions':false}
     }}

From <http://msdn.microsoft.com/en-us/library/office/jj164022.aspx>
When working with SPD 2013, some of the headers are handled for us, others aren’t, but just about everything we need is here.
Let’s look at the pieces of the Call HTTP Web Service action to determine how need to break this information up for the SPD 2013 workflow:
At this point, we can map two portions of Kirk’s sample code to our action:
- this – will contain the url and the method (further details below)
- request – will contain the body object (but not all of it; again, further details below)
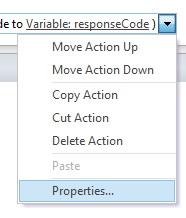
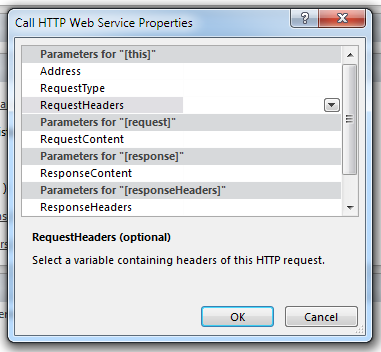
We also need to supply a portion of the Headers to our call, but you can’t see that from here. Click on the drop-down arrow on the right of the action to access the properties.
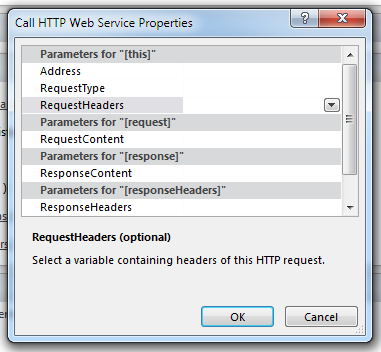
The portion of the Headers we’ll pass will go in the RequestHeaders section:
Building Dictionaries
Now that we know where they go, let’s build some dictionaries; we’ll need three.
First, we’ll build the RequestHeaders dictionary. Even though we’ll actually be calling a couple of web services in our workflow, the request header will be the same, so there’s no real need to make sure that our variable name is unique to this call. Therefore, we’ll just call it header.
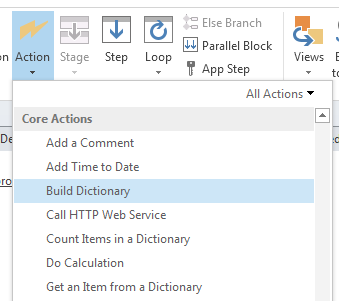
The Build Dictionary action is located under Core Actions.
(Notice two other “Dictionary” actions: Count Items in a Dictionary and Get an Item from a Dictionary. We’ll use the latter later.)
Change the variable name to header, then click this.
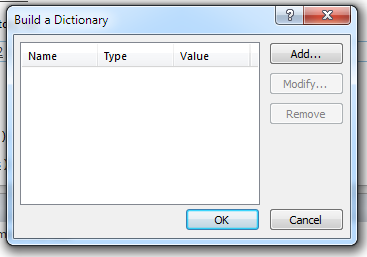
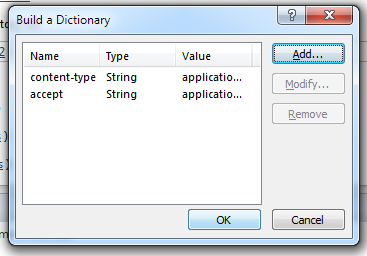
Notice the three columns: Name, Type, and Value:
- Name – is the name of the data element
- Type – it can be any data type, including Dictionary
- Value – the value of the element (if it’s a Dictionary, it must be created first and then referenced here)
For the header, we only need one part of the Headers section (below, in bold), plus another that’s similar:
Headers:
   Authorization: "Bearer " + accessToken,
   X-RequestDigest: form digest value,
   content-type: "application/json;odata=verbose",
   content-length: length of post body
SPD 2013 handles the Authorization, X-RequestDigest, and content-length for us. (Later on, we’ll need them when we do a little work in Fiddler, but the workflow doesn’t need them.)
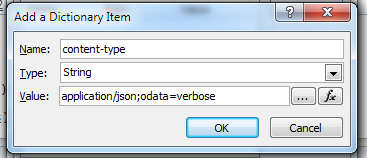
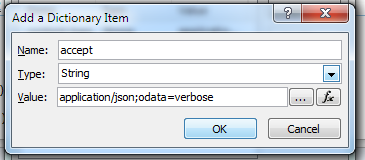
The content-type tells the web service the format in which we’re sending the parameters. We also need to tell it the format we want to receive the response in another parameter named accept. The value of both of these will be the same.
Click Add… to add elements to the Dictionary:
The Type is important; for these make sure it’s String, which is the default.
Click OK, then Add… accept:
Yes, the Value is exactly the same for both. Click OK and you’re done with this one.
Click OK again.
The body section will be used in the request section:
(It’s called RequestContent in the Properties dialog.)
We’ll somewhat build this one as-is, working inside-out.
body: { 'd' :{
   'parameters': {
     '__metadata':  {'type': 'SP.WebInfoCreationInformation' },
     'Url': 'RestSubWeb',
     'Title': 'RestSubWeb',
     'Description': 'rest-created web',
     'Language':1033,
     'WebTemplate':'sts',
     'UseUniquePermissions':false}
   }
}
We need pass the entire payload of ‘d’ to the web service… meaning, when we’re done, we’ll have a Dictionary that contains parameters that we’ll pass to the web service. Every time you see a set of braces ( {} ), tell yourself that’s a Dictionary.
When a Dictionary is inside another Dictionary, the innermost one has to exist first, which is why we build them inside-out.
So, let’s build __metadata first.
Even though the name of this node within parameters will have two underscores at the beginning, when we first create it, the variable is simply a holder for one we’ll create next, so it’s OK for the variable name to be metadata.
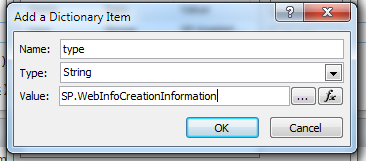
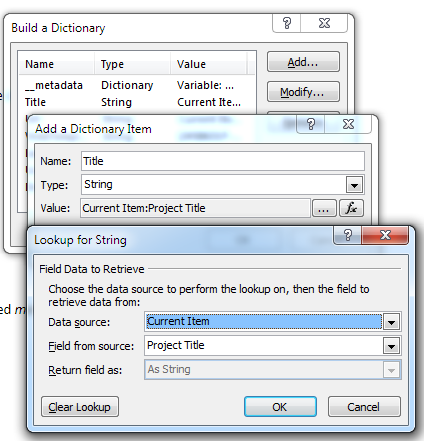
Kind of confusing, but the Name of our Dictionary Item is type but its Type is String. And the Value is SP.WebInfoCreationInformation.
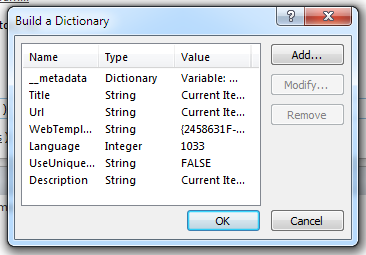
Now, we can create the wrapper around that. To reduce confusion, we’ll call it callParams.
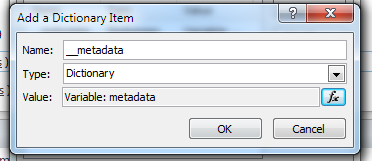
Notice that the first Dictionary Item is named __metadata and is of type Dictionary.
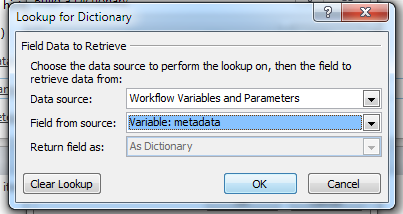
For the value, click the fx button and we’ll choose the Workflow variable we just created, named metadata.
For the Title, Url, and Description, we’ll use the values from the New Project item that the requestor supplied.
For the remainder, use the values in Kirk’s sample:
- Language (type Integer): 1033 (for US English)
- UseUniquePermissions (type String): FALSE (inherits permissions from the parent)
- WebTemplate (type String): sts (for a standard site; notice that’s not what I’m using, but we’ll revisit that further down)
Two down, one to go: the outer parameters wrapper.
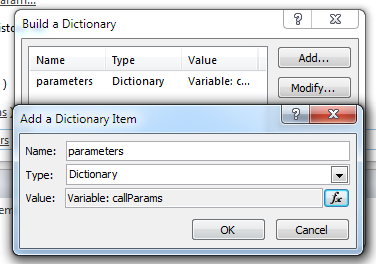
For this wrapper, simply build a dictionary with one item named parameters, make it of type Dictionary, and set it to the workflow variable callParams we just created.
Now that all of the variable pieces are assembled, we have one more thing to do before we can use the Call HTTP Web Service action and ask it to create a site for us.
App Step and App Permissions
As can be expected, creating a site requires site collection administrator permissions. But you won’t want all of your users to have that level of permission just to request a site.
Fortunately, SPD 2013 introduces the concept of the App Step, which a site collection administrator can give elevated permissions to without giving those permissions to individual users.
Three components are required to use the App Step feature:
- The site feature must be activated.Go to Site Settings > Manage site features
Make sure Workflows can use app permissions is Active
- Once activated, SPD 2013 will allow you to add an App Step.
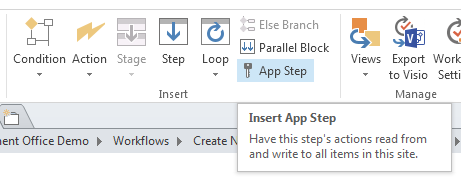 This is where you will put your Call HTTP Web Service action.
- Before it can run, you must give permissions to the App Principal for workflows. This step may only be performed by someone with site collection administrator rights.
Go to Site Settings > Site App Permissions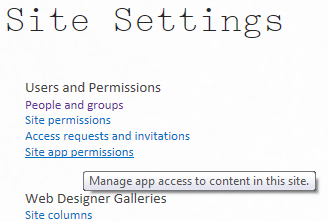 Copy the portion of the App Principal after ms.sp.ext| before the @:
Here’s the magic part…
In the URL for the page you’re on, change it from:To:
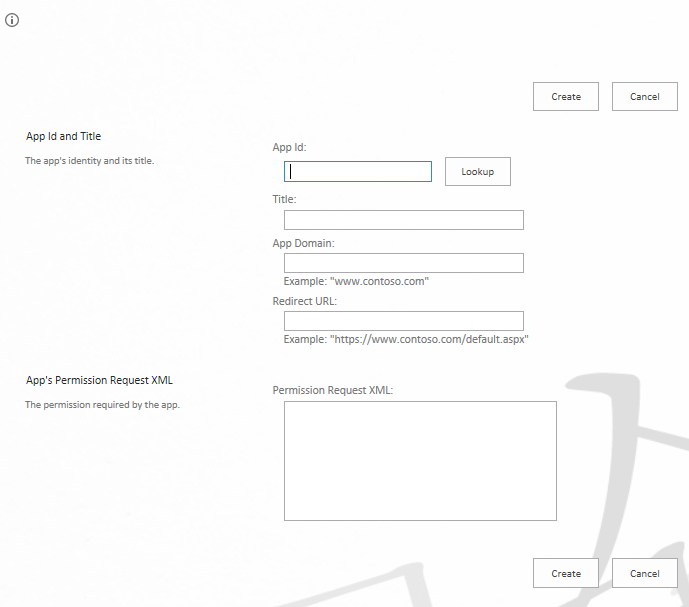
There is no link that takes you to this page. It doesn’t even have a title, but it’s the Grant permissions to an app page.
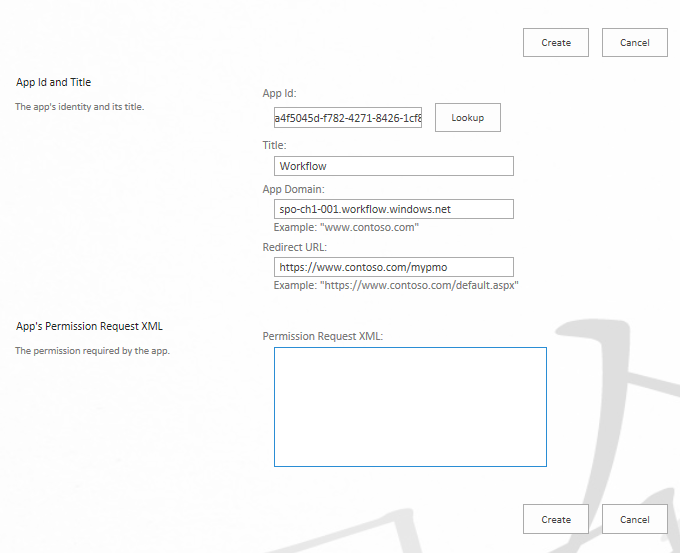
Paste the app principal ID you copied from the previous page into the App Id box and click Lookup.
The next three fields will be filled in for you. Just leave them as-is:
In the Permission Request XML, paste the following as-is (the scope is literal):
<AppPermissionRequests>
     <AppPermissionRequest Scope="http://sharepoint/content/sitecollection/web" Right="FullControl"/>
</AppPermissionRequests>
(For more information on the scope and use of App Permissions, see http://msdn.microsoft.com/en-us/library/office/fp142383.aspx.)
Click Create and you’re done.
Back to the Workflow
Now that we’ve told SharePoint to let our workflow perform its awesomeness, let’s go back to the workflow and implement that awesomeness.
If you haven’t already done so, add an App Step after the step in which you create all of your dictionary variables. Then add the Call HTTP Web Service action to it.
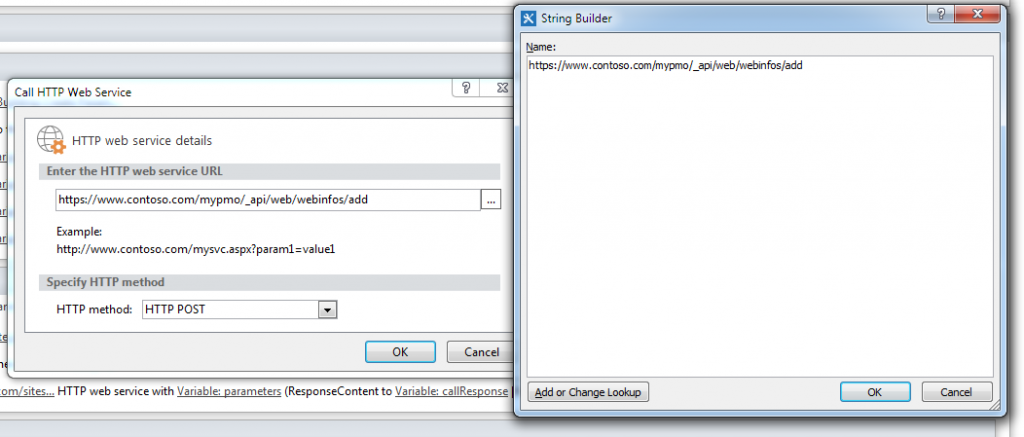
Click this to open the dialog box for this action. Click the ellipsis (…) to open the string builder and enter the url from Kirk’s example:
Substitute your URL for everything before the /_api/web/webinfos/add.
Looking at Kirk’s example, we know that our HTTP method should be POST (SPD calls it HTTP POST).
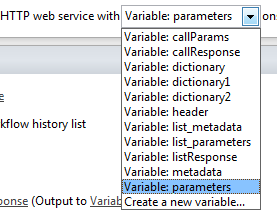
For the request, select your parameters workflow variable.
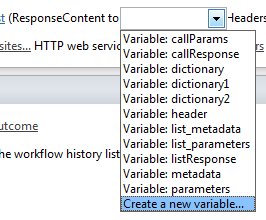
Create a new variable for the response:
I called mine callResponse. This will be a Dictionary variable into which the web service will return its response.
For our purposes, responseHeaders isn’t needed so we can ignore that one. You may want to rename your responseCode to be more descriptive of the call you’re making. Up to you.
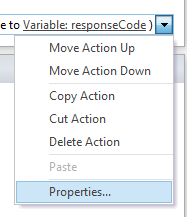
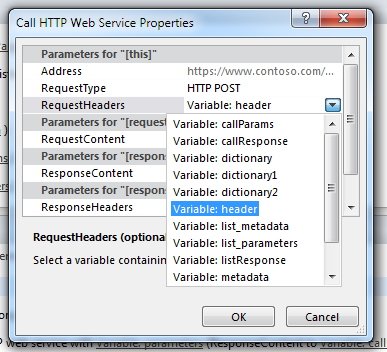
One last thing we have to do is set the request headers. We do this through the action properties.
Notice that all of the properties we’ve already set are here… then choose the header workflow variable for the RequestHeaders.
Done! (Almost…)
That’s all it takes to call the web service action to create a site. If all goes well, all goes well. But sometimes…
Sometimes, things go wrong. Then what?
That’s what the responseCode and callResponse come in.
If all goes well, responseCode will be OK. Otherwise, we have an error to deal with. If it’s OK, though, we probably want to let someone know, via an email.
How’d it Go?
Remember the second part of our Creating Site stage?
For the PMO project, I do some other things if the site creates properly, but for now, let’s focus on what happens if things don’t go well.
When we made the call to the Call HTTP Web Service action, we told it to send the response to a variable named callResponse. If ResponseCode is not OK, we can look in the callResponse to find the error.
If an error occurred, the callResponse will have the following structure:
To get to the elements here, we’ll use the Get Dictionary Item action.
It’s pretty straightforward if you know the structure of what’s coming back. Since we know the structure, here’s what we do:
Ignoring the JSON node, start at the next inward node (in our case, error). Then keep traversing the structure until you get to the node you want, placing a ‘/’ between each node (for the code in our case, error/code). Since the actual error message has two parts, a lang and a value, simply go into the message and get the value (error/message/value).
We’ll write each of those out to a variable we use for reporting the status to the user in an email: errorCode and errorText.
The most common error that will occur using our approach of entering the short URL via a list item is that a site will already exist at that URL. In that case, the create will fail and the errorText will include the phrase “is already in use.” We want to create a special error message for this type of failure to tell the creator that—though their request was approved—the site couldn’t be created because the URL was in use.
NOTE: This error sometime occurs even if the call was successful in creating the site. In my communiqués with the creator and PMO manager, I include this tidbit of information and encourage them to go to the site to see if (a) there really was another site at that location, or (b) THEIR site is at that location. If it’s the latter, all is well.
If a different error occurs, I simply write the error code and the error message into the email and send it to the both the creator and PMO manager, and ask them to contact the developer (me) to track down the cause of the error.
Conclusion
Using SPD 2013’s new Dictionary data type and Call HTTP Web Service, it’s now possible to create a workflow to perform anything in SharePoint from within a workflow.
But what if you want to create a site using a custom template?
[KUDOS: Thanks to Fabian Williams and Ryan Dennis for the assist.]




Hi,
Nice Post, I am able to create a Subsite in same sitecollection, but on the other Site collection, is there any limitation.
Thanks,
Raja
Posted by Raja | September 11, 2014, 3:32 PMHi! Thanks for the great tutorial. 🙂
But- I have a question… my workflow is failing, and I get the error below:
–
-1, Microsoft.SharePoint.Client.ClientServiceException
The HTTP method ‘GET’ cannot be used to access the resource ‘Add’. The operation type of the resource is specified as ‘Default’. Please use correct HTTP method to invoke the resource.
Is there any insight you might be able to offer?
Thanks!!
Posted by Nancy Skaggs | October 26, 2016, 8:53 AMHi Nancy! Long time, no see. (And sorry I’m just seeing this.)
“Add” is a POST function. You might have success by just making that change on the HTTP call. Anything that requires writing/updating/deleting information requires POST.
Please let me know how it goes.
Posted by jimbobhoward | November 9, 2016, 10:02 AMJim Bob .. do you have a post on how to do a dashboard with a CQWP to roll up of each project’s status?
This would be very helpful.
Thanks
Posted by Tony | November 10, 2016, 2:18 PMHi Tony,
Thanks for the note. No, I don’t have a post about that… but, I basically copied the HTML of the output from the JSLink/CSR and worked it into the XSL of the template for the the CQWP.
Then I set up the CQWP to find and display all list items of the Project Status content type.
Does that help?
Blessings,
Jim Bob
Posted by jimbobhoward | November 10, 2016, 3:08 PMHey Jim – Thanks for the reply but as I am still a beginner in SharePoint would it be possible to see a sample of how to do the dashboard.. we have a project and this one step is our stop gap right now…. trying to find a quick solution… thanks for your time…
Posted by Tony | December 6, 2016, 12:23 PMYou’re welcome, Tony. Unfortunately, XSLT in a CQWP isn’t a quick solution if you’re not familiar with it.
There are details here that can help: https://msdn.microsoft.com/en-us/library/office/bb447557(v=office.14).aspx
I’ll also try to post my templates as a starting point for you.
Posted by Jim Bob Howard | December 6, 2016, 3:18 PMHi
Thanks for the tutorial 🙂
Is there a way to sett the subsite to inherret links in top bar?
Posted by jarle langemyr | November 23, 2016, 4:28 PMYes, if you create the site template with that setting.
Posted by jimbobhoward | December 6, 2016, 4:42 PMHello, are you able to verify that this is the case. I have been looking for a way to do this through workflow and everything I find says its not possible.
Thanks.
Posted by Christopher | February 28, 2018, 2:40 PMUm… did you follow the steps? It’s totally doable with the right permissions.
Posted by jimbobhoward | March 1, 2018, 1:14 AMGreat tutorial – love the idea.
I’ve attempted twice, but still getting “System.UnauthorizedAccessException – Access denied. You do not have permission to perform this action or access this resource.”
Gave workflow Full Control…
Any ideas?
Posted by J. Baltz | June 16, 2017, 10:01 AMAnd you didn’t have any errors giving the workflow permissions?
Posted by jimbobhoward | June 29, 2017, 11:41 PM